Photo by Mark König on Unsplash
Develop an e-Commerce Store using Django for Beginners
Develop an e-Commerce store where users can add items to a cart and make payment
Table of contents
- We will use the following approach to build the e-commerce store:
- 1. Get a template:
- 2. Start a Django project and application:
- 3. Add your templates and static files to the Django file system and configure URLs:
- 4. Define a model to save products and call those products onto your web pages:
- 5. Develop the cart system
- 5. Develop the payment system
- Conclusion
We will use the following approach to build the e-commerce store:
- Get a template
- Start a Django project and application
- Add your template to the Django file system and configure URLs.
- Define a model to save products and call those products onto your web pages.
- Develop the cart system
- Develop the payment system
1. Get a template:
You can download the template from the following link: github.com/emmakodes/myecommercestore/blob/..
The template contains HTML and static files, basically the front end so that we can focus on building the backend using Django.
2. Start a Django project and application:
Open a new window or project on your code editor(Visual Studio Code, Pycharm), then open the terminal. Run the following command on the terminal to create a virtual environment named "myvenv"
python -m venv myvenv
Activate the virtual environment
myvenv\Scripts\activate
install Django
pip install Django
Start a Django project, Notice the full stop at the end:
django-admin startproject djangoecommerceproject .
Start a Django application
python manage.py startapp djangoecommerceapp
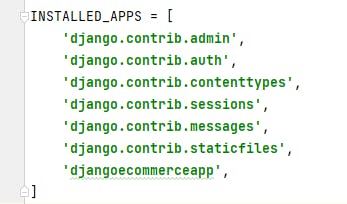
Open settings.py file inside djangoecommerceproject package(folder) and add your newly created Django application 'djangoecommerceapp' in INSTALLED_APPS to register the app.
3. Add your templates and static files to the Django file system and configure URLs:
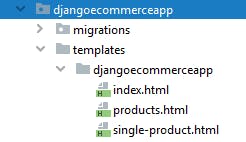
Create a folder called 'templates' in djangoecommerceapp package(folder) and inside the templates folder create another folder 'djangoecommerceapp' where you will place the HTML files from the template you downloaded. Your folder structure should be as below:
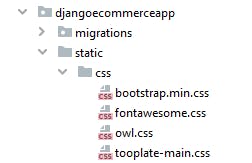
 Create another folder 'static' in djangoecommerceapp package and inside of static create two folders 'css', and 'js'. Place the CSS, and Javascript files from the template you downloaded into the 'css' and 'js' folders.
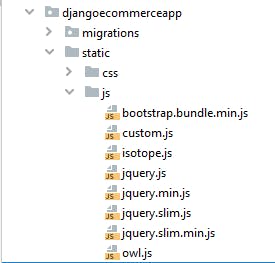 We will define URL pattern for each of the HTML pages. create a urls.py file inside 'djangoecommerceapp' package and add the following code:
from django.urls import path
from . import views

app_name = 'djangoecommerceapp'   # app name

# pattern for the index page, all products and each product
urlpatterns = [
    path('', views.index, name='index'),
    path('products/', views.product_list, name='product_list'),
    path('productdetail/<int:id>/', views.product_detail, name='product_detail'),
]
Open urls.py file inside 'djangoecommerceproject' and include newly created urls.py file.
from django.contrib import admin
from django.urls import path, include

urlpatterns = [
    path('admin/', admin.site.urls),
    path('', include('djangoecommerceapp.urls', namespace='djangoecommerceapp')),
]
Open views.py in 'djangoecommerceapp' and add the following function to render each HTML file to your web browser:
from django.shortcuts import render

# Create your views here.
def index(request):
    return render(request, 'djangoecommerceapp/index.html')

def product_list(request):
    return render(request, 'djangoecommerceapp/products.html')

def product_detail(request):
    return render(request, 'djangoecommerceapp/single-product.html')
When you start Django development server by running python manage.py runserver on the terminal and access http://127.0.0.1:8000/ 127.0.0.1:8000/products 127.0.0.1:8000/productdetail/1 on your web browser, you will notice your webpages have no style or javascript as below:
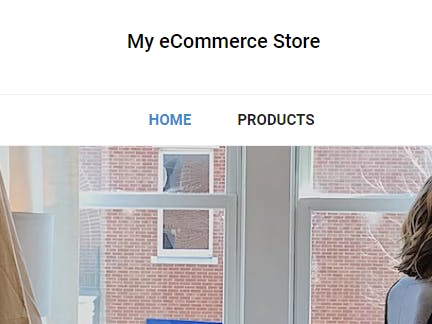
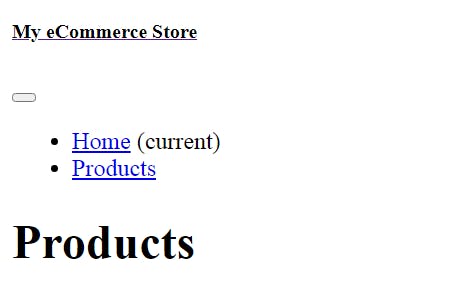 We have to load the CSS and Javascript files. Open each HTML files: index.html, products.html, single-product.html and add {% load static %} at the top of each file also add Django template tag to each CSS link tag and JavaScript script tag. Your code should be as below:

 Now, when you access http://127.0.0.1:8000/ 127.0.0.1:8000/products 127.0.0.1:8000/productdetail/1 your page should look as below:
4. Define a model to save products and call those products onto your web pages:
Open the models.py file in 'djangoecommerceapp' and add the following code:
from django.db import models

# fields to save product name, image, description and price.
class Product(models.Model):
    name = models.CharField(max_length=200)
    image = models.ImageField(upload_to='images')
    description = models.TextField(blank=True)
    price = models.DecimalField(max_digits=10,decimal_places=2)

    def __str__(self):
        return self.name
Since we are working with images, run the following command on the terminal to install pillow to manage images:
pip install pillow
Add the following code in settings.py file:
MEDIA_URL = 'media/'
MEDIA_ROOT = BASE_DIR / 'media'
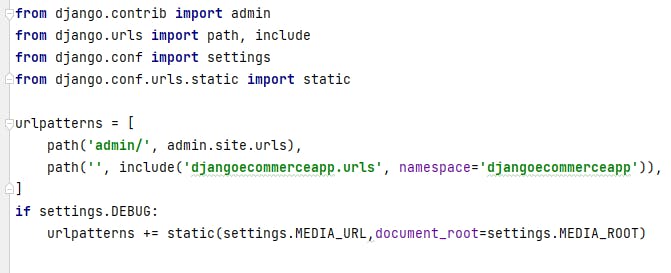
MEDIA_URL is the base URL that serves media files uploaded by users. MEDIA_ROOT is the local path where these files reside. change urls.py in 'djangoecommerceproject' to be as the following:
 Run the following to make migrations and also migrate to sync the database.
python manage makemigrations
python manage.py migrate
Register Product model on the administration site. Open admin.py file in djangoecommerceapp and add the following code:
from django.contrib import admin
from .models import Product

# Register your models here.
admin.site.register(Product)
Now create a superuser, run the following command and enter your desired username, email, and password
python manage.py createsuperuser
You can start the development server, access the admin page 127.0.0.1:8000/admin and add products to your model
python manage.py runserver
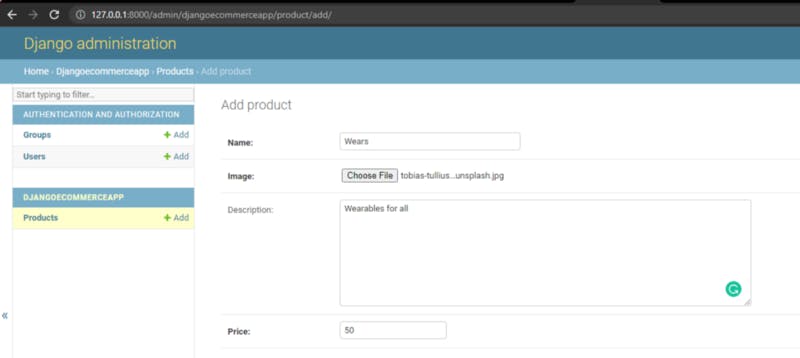 Since, we have added products, to call those onto our webpage, we then need to go to views.py in 'djangoecommerceapp' and add the following code:
from django.shortcuts import render, get_object_or_404
from .models import Product

# Create your views here.
def index(request):
    products = Product.objects.all() # get all data
    context = {
        'products' : products,
    }
    return render(request, 'djangoecommerceapp/index.html',context)

def product_list(request):
    products = Product.objects.all()
    context = {
        'products' : products,
    }
    return render(request, 'djangoecommerceapp/products.html',context)

def product_detail(request, id):
    product = get_object_or_404(Product, pk=id) # get single data
    context = {
        'product' : product,
    }
    return render(request, 'djangoecommerceapp/single-product.html',context)
We import the Product model, call data, and pass them to our template.
We will call the data to the HTML files. Open index.html, products.html, and single-product.html files and make changes according to the following code:
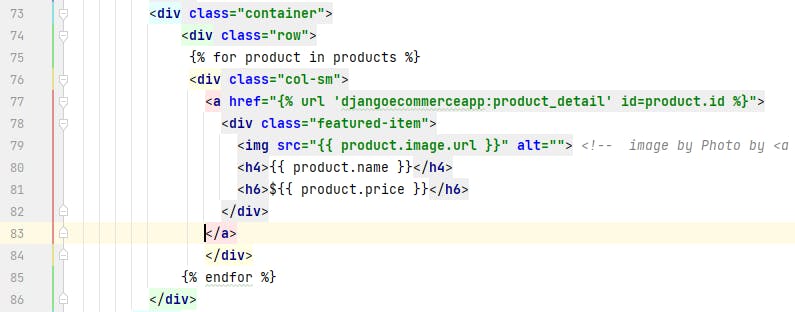 index.html
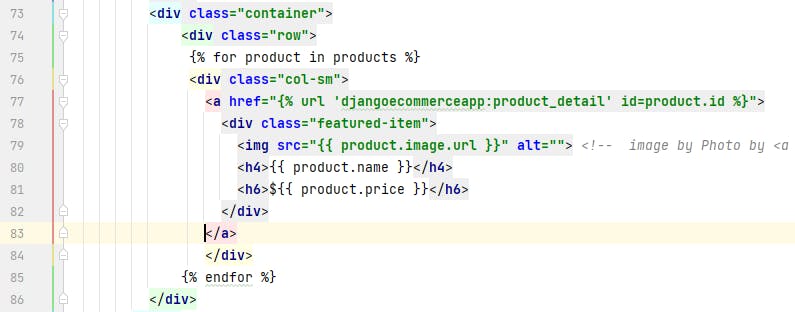 products.html
 single-product.html
You can use the line numbers to know where to make changes in index.html, products.html, and single-product.html respectively.
5. Develop the cart system
A user is supposed to be able to add products to cart before buying that product, that is what we are going to work on now.
We are going to use Django session framework to save the cart items. The session framework allows you to store data for each visitor.
Add the following code on the last line of the settings.py file
CART_SESSION_ID = 'cart'
This is the key you will use to store the cart in the user session. Start a new Django application 'cart'
python manage.py startapp cart
Add the newly created app to INSTALLED_APPS in settings.py
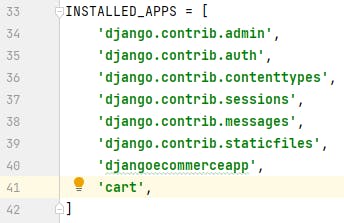 Create a new cart.py file in the 'cart' package folder and add the following code:
from decimal import Decimal
from django.conf import settings
from djangoecommerceapp.models import Product

class Cart:
    def __init__(self, request):
        """
        Initialize the cart.
        """
        self.session = request.session
        cart = self.session.get(settings.CART_SESSION_ID)
        if not cart:
            # save an empty cart in the session
            cart = self.session[settings.CART_SESSION_ID] = {}
        self.cart = cart

    def __iter__(self):
        """
        Iterate over the items in the cart and get the products
        from the database.
        """
        product_ids = self.cart.keys()
        # get the product objects and add them to the cart
        products = Product.objects.filter(id__in=product_ids)
        cart = self.cart.copy()
        for product in products:
            cart[str(product.id)]['product'] = product
        for item in cart.values():
            item['price'] = Decimal(item['price'])
            item['total_price'] = item['price'] * item['quantity']
            yield item

    def __len__(self):
        """
        Count all items in the cart.
        """
        return sum(item['quantity'] for item in self.cart.values())

    def add(self, product, quantity=1, override_quantity=False):
        """
        Add a product to the cart or update its quantity.
        """
        product_id = str(product.id)
        if product_id not in self.cart:
            self.cart[product_id] = {'quantity': 0,
                                     'price': str(product.price)}
        if override_quantity:
            self.cart[product_id]['quantity'] = quantity
        else:
            self.cart[product_id]['quantity'] += quantity
        self.save()

    def save(self):
        # mark the session as "modified" to make sure it gets saved
        self.session.modified = True

    def remove(self, product):
        """
        Remove a product from the cart.
        """
        product_id = str(product.id)
        if product_id in self.cart:
            del self.cart[product_id]
            self.save()

    def clear(self):
        # remove cart from session
        del self.session[settings.CART_SESSION_ID]
        self.save()

    def get_total_price(self):
        return sum(Decimal(item['price']) * item['quantity'] for item in self.cart.values())
The above code contains methods to save, remove, add, and get the total price of the cart. Create a forms.py file in 'cart' package folder and add the following code:
from django import forms

PRODUCT_QUANTITY_CHOICES = [(i, str(i)) for i in range(1, 101)]

class CartAddProductForm(forms.Form):
    quantity = forms.TypedChoiceField(
                                choices=PRODUCT_QUANTITY_CHOICES,
                                coerce=int)
    override = forms.BooleanField(required=False,
                                  initial=False,
                                  widget=forms.HiddenInput)
This form will allow users to select the number of products to buy. Edit views.py of 'cart' package folder:
from django.shortcuts import render, redirect, get_object_or_404
from django.views.decorators.http import require_POST
from djangoecommerceapp.models import Product
from .cart import Cart
from .forms import CartAddProductForm

@require_POST
def cart_add(request, product_id):
    cart = Cart(request)
    product = get_object_or_404(Product, id=product_id)
    form = CartAddProductForm(request.POST)
    if form.is_valid():
        cd = form.cleaned_data
        cart.add(product=product,
                 quantity=cd['quantity'],
                 override_quantity=cd['override'])
    return redirect('cart:cart_detail')

@require_POST
def cart_remove(request, product_id):
    cart = Cart(request)
    product = get_object_or_404(Product, id=product_id)
    cart.remove(product)
    return redirect('cart:cart_detail')

def cart_detail(request):
    cart = Cart(request)
    for item in cart:
        item['update_quantity_form'] = CartAddProductForm(initial={
                            'quantity': item['quantity'],
                            'override': True})
    return render(request, 'cart/detail.html', {'cart': cart})
cart_add receives product_id as a parameter, gets the product instance, checks if the form is valid, and then adds the product to the cart. cart_remove gets products from the model and removes products from the cart. cart_detail gets the current cart and displays it.
Configure URL pattern for each views. Create a new file urls.py in cart package folder and add the following:
from django.urls import path
from . import views

app_name = 'cart'

urlpatterns = [
    path('', views.cart_detail, name='cart_detail'),
    path('add/<int:product_id>/', views.cart_add, name='cart_add'),
    path('remove/<int:product_id>/', views.cart_remove, name='cart_remove'),
]
Edit the main urls.py file of the ecommercedjangoproject folder and add the following highlighted URL pattern:
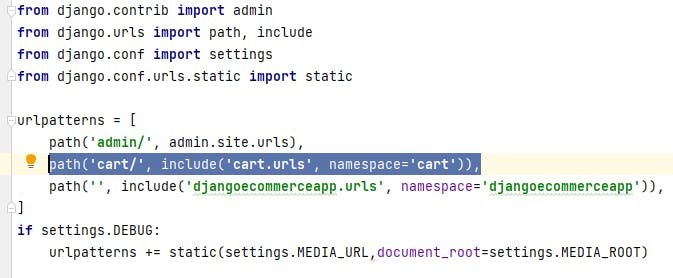 Create a folder 'templates' in cart package folder and inside create another folder 'cart' and add a detail.html file as below:
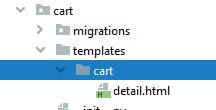 Place the following code in detail.html to show cart details:
<!DOCTYPE html>
<head>
<style>
table {
  font-family: arial, sans-serif;
  border-collapse: collapse;
  width: 100%;
}

td, th {
  border: 1px solid #dddddd;
  text-align: left;
  padding: 8px;
}

tr:nth-child(even) {
  background-color: #dddddd;
}
</style>
</head>
<body>
<div>
  {% with total_items=cart|length %}
    {% if total_items > 0 %}
      Your cart:
      <a href="{% url 'cart:cart_detail' %}">
        {{ total_items }} item{{ total_items|pluralize }},
        ${{ cart.get_total_price }}
      </a>
    {% elif not order %}
      Your cart is empty.
    {% endif %}
  {% endwith %}
</div>
<h2>Your Shopping Cart</h2>

<table>
  <tr>
    <th>Image</th>
    <th>Product</th>
    <th>Quantity</th>
    <th>Remove</th>
    <th>Unit Price</th>
    <th>Price</th>
  </tr>
  <tr>
    {% for item in cart %}
        {% with product=item.product %}
    <td><img src="{{ product.image.url }}" style="max-height:10%;max-width:10%"></td>
    <td>{{ product.name }}</td>
    <td>
      <form action="{% url 'cart:cart_add' product.id %}" method="post">
                {{ item.update_quantity_form.quantity }}
                {{ item.update_quantity_form.override }}
                <input type="submit" value="Update">
                {% csrf_token %}
              </form>
    </td>
    <td>
      <form action="{% url 'cart:cart_remove' product.id %}" method="post">
                <input type="submit" value="Remove">
                {% csrf_token %}
      </form>
    </td>
    <td>${{ item.price }}</td>
    <td>${{ item.total_price }}</td>
  </tr>
  {% endwith %}
      {% endfor %}

        <tr>
        <td>Total</td>
        <td colspan="4"></td>
        <td class="num">${{ cart.get_total_price }}</td>
      </tr>
</table>
  <p class="text-right">
    <a href="{% url 'djangoecommerceapp:product_list' %}">Continue shopping</a>
<a href="" class="button">Checkout</a>
</p>
</body>
</html>
We will add ' add to cart ' to product detail page, edit the views.py of the ecommercedjangoapp. We will import and instantiate the form to add cart item
 Add the following code to the single-product.html file as below:
 Run the development server and go to 127.0.0.1:8000/productdetail/1 your page should look as below:
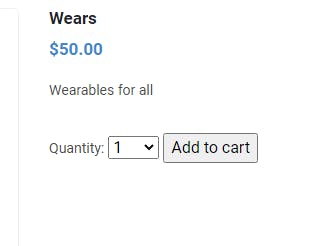 When you click on Add to cart, the product will be added to cart and you will be taken to a detail page as below:
 You can update or remove the product to test the functionalities.
You can add a link to the cart detail page by adding the following code to single-product.html or any HTML files

5. Develop the payment system
To develop the payment system, we will make use of 'Paystack' payment system. Create a new application to save customers' details and the product they are buying.
python manage.py startapp orders
Add the application to INSTALLED_APPS in settings.py of 'djangoecommerceproject'
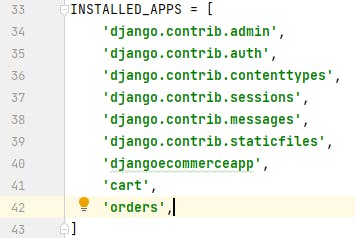 Open models.py file in 'orders' package folder and add the following code to create Customer and OrderItem model to save customers' details and order items bought.
from django.db import models
from djangoecommerceapp.models import Product

class Customer(models.Model):
    first_name = models.CharField(max_length=50)
    last_name = models.CharField(max_length=50)
    email = models.EmailField()
    address = models.CharField(max_length=250)
    postal_code = models.CharField(max_length=20)
    city = models.CharField(max_length=100)
    created = models.DateTimeField(auto_now_add=True)
    updated = models.DateTimeField(auto_now=True)

    def __str__(self):
        return self.email

    def get_total_cost(self):
        return sum(item.get_cost() for item in self.items.all())

class OrderItem(models.Model):
    customer = models.ForeignKey(Customer,
                              related_name='items',
                              on_delete=models.CASCADE)
    product = models.ForeignKey(Product,
                                related_name='order_items',
                                on_delete=models.CASCADE)
    price = models.DecimalField(max_digits=10,
                                decimal_places=2)
    quantity = models.PositiveIntegerField(default=1)

    def __str__(self):
        return f'Customer : {self.customer} ; product : {self.product}'

    def get_cost(self):
        return self.price * self.quantity
Run the below command on your terminal to create initial migrations for the orders' application:
python manage.py makemigrations
Run the following command to apply the new migration:
python manage.py migrate
Include the models in the administration site. Open admin.py in orders package folder and the following:
from django.contrib import admin
from .models import Customer, OrderItem

admin.site.register(OrderItem)

@admin.register(Customer)
class CustomerAdmin(admin.ModelAdmin):
    list_display = ['first_name', 'last_name', 'email',
                    'address', 'postal_code', 'city',
                    'created', 'updated']
    list_filter = ['created', 'updated']
OrderItem and Customer will be registered to the administration site.
Start your development server and access the administration page 127.0.0.1:8000/admin You should see a page as this:
 Open detail.html in 'cart' package folder and update your code as below to add a URL to add a customer:
 Create a urls.py file in 'orders' package folder and add the following code:
from django.urls import path
from . import views

app_name = 'orders'

urlpatterns = [
    path('create/', views.add_customer, name='add_customer'),
]
Create a forms.py file in orders package folder and include the following to create a form to save customers' details:
from django import forms
from .models import Customer

class CustomerCreateForm(forms.ModelForm):
    class Meta:
        model = Customer
        fields = ['first_name', 'last_name', 'email', 'address',
        'postal_code', 'city']
In the views.py file of the orders package folder add the following to render an empty form or to save customers' details:
from django.shortcuts import render
from .forms import CustomerCreateForm
from cart.cart import Cart

def add_customer(request):
    cart = Cart(request)
    if request.method == 'POST':
        form = CustomerCreateForm(request.POST)
        if form.is_valid():
            customer = form.save()
            return render(request, 'orders/payment.html',
                          {'email':customer.email, 'id':customer.id})
    else:
        form = CustomerCreateForm()
    return render(request,
                  'orders/order/create.html',
                  {'cart': cart, 'form': form})
Create a templates folder in orders package folder. Inside the templates create another folder 'orders'. Create a 'create.html' file in the newly created 'orders' folder
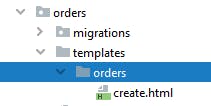 Place the following code in create.html, this will render a form where the user can enter their details:
<!DOCTYPE html>
<html lang="en">
<head>
    <meta charset="UTF-8">
    <title>Customer Details</title>
</head>
<body>
<h1>Checkout</h1>
    <div class="order-info">
        <h3>Your order</h3>
    <ul>
    {% for item in cart %}
        <li>
          {{ item.quantity }}x {{ item.product.name }}
          <span>${{ item.total_price }}</span>
        </li>
        {% endfor %}
    </ul>
    <p>Total: ${{ cart.get_total_price }}</p>
</div>
<form action="{% url 'orders:add_customer' %}" method="post">
    {% csrf_token %}

    <div>
        {{form.as_p}}
    </div>

    <input type="Submit" value="Add detail to make Payment">
</form>
</body>
</html>
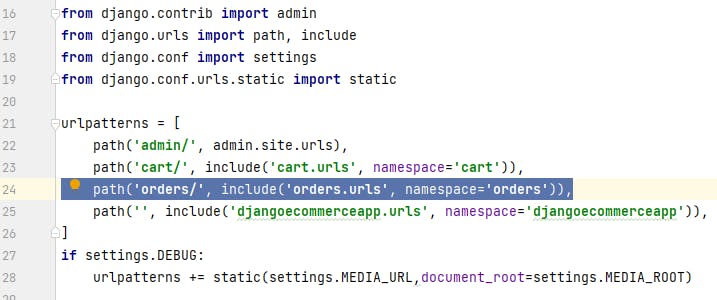
Add the urls.py file of orders package to djangoecommerceproject. Open urls.py file of djangoecommerceproject and add below:
 It's time to call 'Paystack' to process payments.
Go to paystack.com and Create a free account, don't forget to verify your email.
Create a payment.html file in the orders folder inside the templates folder:
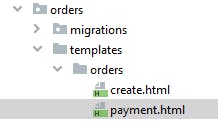 In payment.html, add the following code to call paystack to process the payment:
<!DOCTYPE html>
<html lang="en">
<head>
    <meta charset="UTF-8">
    <script src="https://js.paystack.co/v1/inline.js"></script>
    <title>Payment</title>
</head>
<body>

<h1>Checkout</h1>
    <div class="order-info">
        <h3>Your order</h3>
    <ul>
    {% for item in cart %}
        <li>
          {{ item.quantity }}x {{ item.product.name }}
          <span>${{ item.total_price }} {{email}}</span>
        </li>
        {% endfor %}
    </ul>
    <p>Total: ${{ cart.get_total_price }}</p>
</div>

     <form id="paymentForm">

        <div class="form-submit">
            <button type="submit" onclick="payWithPaystack()"> Pay </button>
        </div>
    </form>
<script>
    const paymentForm = document.getElementById('paymentForm');
    paymentForm.addEventListener("submit", payWithPaystack, false);
    function payWithPaystack(e) {
      e.preventDefault();

      let handler = PaystackPop.setup({
        key: 'YOUR_PUBLIC_KEY', // Replace with your public key
        email: "{{email}}",
        amount: {{ cart.get_total_price }} * 100,
        ref: ''+Math.floor((Math.random() * 1000000000) + 1), // generates a pseudo-unique reference. Please replace with a reference you generated. Or remove the line entirely so our API will generate one for you
        // label: "Optional string that replaces customer email"
        onClose: function(){
          alert('Window closed.');
        },
        callback: function(response){
             window.location = "{% url 'orders:save_item' id %}";
        }
      });

      handler.openIframe();
    }
</script>
</body>
</html>
In your paystack dashboard, go to settings then API Keys & Webhooks, copy your Test Public Key and replace key in payment.html with your public key :

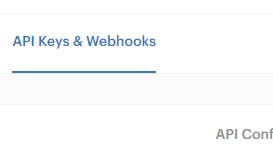 In urls.py of orders package folder, add the following code:
from django.urls import path
from . import views

app_name = 'orders'

urlpatterns = [
    path('create/', views.add_customer, name='add_customer'),
    path('saveitems/<int:id>', views.save_item, name='save_item'),
]
Add the following code in views.py file of orders package to save items and redirect to product list page.
from django.shortcuts import get_object_or_404, redirect
from .models import Customer, OrderItem

def save_item(request, id):
    cart = Cart(request)
    customer = get_object_or_404(Customer, pk=id)
    for item in cart:
        OrderItem.objects.create(customer=customer,
                                 product=item['product'],
                                 price=item['price'],
                                 quantity=item['quantity'])
    # clear the cart
    cart.clear()
    return redirect('djangoecommerceapp:product_list')
You have the e-commerce web application with a complete cart and payment system.
Conclusion
Checkout the complete code here: github.com/emmakodes/e-commerce
